There are several different options available when building a
greenhouse foundation. There are a few things every foundation should provide:
1. It must be anchored to the ground (Wind gusts can move or turn
over a greenhouse because of its low weight to surface area ratio).
2. There must be a way for water to drain out of the greenhouse (If water doesn't
drain, it will collect on the floor and become stagnant promoting algae, disease,
and insect growth).
3. Measures should be taken to prevent weeds and grass from growing in the greenhouse
floor (Greenhouses will provide optimum conditions for weeds to grow along with
other the plants you have. Weeds can harbor harmful insects and diseases and should
be
kept out of the greenhouse).
4. Foundations for glass covered greenhouses 12' x 16' or larger should have cement
footers that extend below the frostline.
Before you start any foundation, you should know the greenhouse's outside base
dimensions: ( Grow More greenhouse dimensions,
Solar Harvest greenhouse dimensions, Cross
Country Greenhouses: Standard twinwall
dimensions, Arctic dimensions,
Lean-to dimensions, Cape
Cod dimensions, Cottage dimensions).
Below are three of the most commonly built foundations that provide all of the
features mentioned above, wood, concrete
slab, and concrete wall.
Wood Foundation
Building a foundation out of wood is simple and inexpensive making it an excellent
option for most home greenhouses. We recommend using naturally resistant woods,
such as cedar, redwood, or cypress. These woods contain substances that inhibit
decay. Pressure-treated wood is also available in most areas but contains copper
and is corrosive to aluminum. When using pressure-treated wood, a minimum 10 mil
thick barrier should be placed between the wood and aluminum frame. Common barrier
materials include polyethylene, vinyl, and plastic composite lumber.
The first step to building a greenhouse is constructing a foundation, but
before you begin you should have a level site prepared for your greenhouse. We
recommend using 4" x 6" (4" x 4" are acceptable for the smaller
sizes) timbers for the foundation of a Solar
Harvest, Grow More, or Cross
Country greenhouse. The wood can be cut to size with a standard hand or power
saw once it has been purchased.
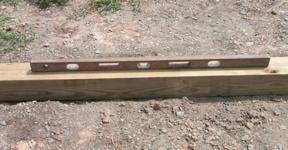 Once
you have cut the wood to fit the greenhouse, lay the boards together on the ground
like you are going to set the greenhouse on them (make sure you remove any rocks,
sticks or dirt clogs that keep the board from laying flush on the ground). Set
a level on top of one of the boards (shown in picture at left). The horizontal
bubble should be in-between the 2 lines marked on the level. This should be done
for each board to ensure that the greenhouse base is level. Once
you have cut the wood to fit the greenhouse, lay the boards together on the ground
like you are going to set the greenhouse on them (make sure you remove any rocks,
sticks or dirt clogs that keep the board from laying flush on the ground). Set
a level on top of one of the boards (shown in picture at left). The horizontal
bubble should be in-between the 2 lines marked on the level. This should be done
for each board to ensure that the greenhouse base is level.
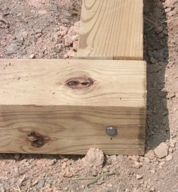 When
the foundation has been leveled, it is time to secure the timbers together with
lag screws (shown in picture to the right). The lag screw should be three or more
inches longer than the first board it is screwed through to insure a proper hold.
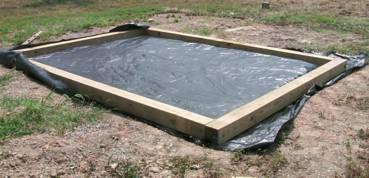
Once this has been done for each corner, we chose to lay our ground cover (shown
in the picture below) under the base and cut any excess fabric around the edges.
You can lay the ground cover after completing the base, but we have found that
this way does a better job of keeping weeds out of the corners of the greenhouse.
Make sure you use a ground cover (also
called weed barrier) that is made for landscaping and not black plastic or a tarp.
Ground cover will allow water to drain through the fabric while keeping weeds
from growing in your greenhouse. When
the foundation has been leveled, it is time to secure the timbers together with
lag screws (shown in picture to the right). The lag screw should be three or more
inches longer than the first board it is screwed through to insure a proper hold.
Once this has been done for each corner, we chose to lay our ground cover (shown
in the picture below) under the base and cut any excess fabric around the edges.
You can lay the ground cover after completing the base, but we have found that
this way does a better job of keeping weeds out of the corners of the greenhouse.
Make sure you use a ground cover (also
called weed barrier) that is made for landscaping and not black plastic or a tarp.
Ground cover will allow water to drain through the fabric while keeping weeds
from growing in your greenhouse.
 Now that the greenhouse foundation has been built, it is important to make sure
your base is square. To do this, use your tape measure, and take two diagonal
measurements of the base (One from the front left corner to the back right corner
and the other from the front right corner to the back left corner). The base needs
to be adjusted until the two measurements are the same. You are now ready to anchor
your foundation to the ground (If you are using earth
anchors Click Here for directions).
Now that the greenhouse foundation has been built, it is important to make sure
your base is square. To do this, use your tape measure, and take two diagonal
measurements of the base (One from the front left corner to the back right corner
and the other from the front right corner to the back left corner). The base needs
to be adjusted until the two measurements are the same. You are now ready to anchor
your foundation to the ground (If you are using earth
anchors Click Here for directions).
Now that you have finished building a foundation for your new greenhouse, it
is time to put in the floor and secure the greenhouse structure to the base.
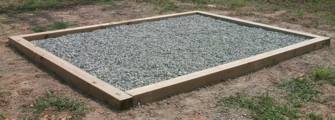 We
used gravel to complete our greenhouse floor. There are many options to choose
from for your greenhouse floor, but we recommend sand or small gravel because
they have good drainage. In the picture to the left, there is about 2 to 3 inches
of gravel in the base (you should use enough to completely cover the ground cover
under it). We
used gravel to complete our greenhouse floor. There are many options to choose
from for your greenhouse floor, but we recommend sand or small gravel because
they have good drainage. In the picture to the left, there is about 2 to 3 inches
of gravel in the base (you should use enough to completely cover the ground cover
under it).
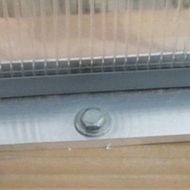 Now
it is time to secure your greenhouse to the foundation base. We recommend using
2" galvanized lag screws and washers for this job. Drill a small hole in
the aluminum ridge at the bottom of the greenhouse frame to start the lag screw
in (it is recommended that you insert one screw for each panel in your greenhouse).
After you have drilled all of the necessary holes, place a washer over each hole
and secure the screws into the greenhouse base as shown in the picture to the
right (view is from outside of greenhouse). For added insulation, you can caulk
the bottom of the aluminum ridge where it meets the the base with sealant. This
will help seal the greenhouse to the base keeping cold air from entering and warm
air from escaping in the winter. That's it! Your greenhouse is now ready to provide
you with many years of enjoyment. Now
it is time to secure your greenhouse to the foundation base. We recommend using
2" galvanized lag screws and washers for this job. Drill a small hole in
the aluminum ridge at the bottom of the greenhouse frame to start the lag screw
in (it is recommended that you insert one screw for each panel in your greenhouse).
After you have drilled all of the necessary holes, place a washer over each hole
and secure the screws into the greenhouse base as shown in the picture to the
right (view is from outside of greenhouse). For added insulation, you can caulk
the bottom of the aluminum ridge where it meets the the base with sealant. This
will help seal the greenhouse to the base keeping cold air from entering and warm
air from escaping in the winter. That's it! Your greenhouse is now ready to provide
you with many years of enjoyment.
Concrete
Foundation
- Concrete Slab Foundation -
A concrete slab makes a convenient base for a greenhouse. For an attached structure,
the finish floor is generally placed level with or one or two steps below the
house floor. For a freestanding greenhouse, the floor should be several inches
above the finish outside grade. It is recommended when preparing the concrete
foundation that the size be made 1" longer and wider than the greenhouse
outside dimensions. A 3 inch thick floor is adequate for home greenhouses. The
outside edges should be thicker to give support and resist cracking from frost.
A drain should be placed in the center of the greenhouse
slab that drains into a gravel pit or into a pipe leading to a drainage area outside
the perimeter of the greenhouse. At least 4 inches of compacted gravel
or stone should be placed on top of the subsoil to provide drainage. Also, placing
a 6 mil polyethylene moisture barrier on top of the gravel or stone will keep
the slab dry.
Build a form out of lumber around the perimeter. The top of the form should
be at the finish floor height. Reinforcing wire or fiber should be added to increase
the strength of the slab. Once the concrete has set (usually about 24 hours),
the forms can be removed. Insulation board 1 to 1 1/2 inches thick can be installed
vertically around the outside of the foundation to a depth of 1 to 2 feet. This
insulates the floor and helps keep it warmer in the winter. One recommended option
whether you use a slab or wall is to fasten a 2" x 4" sill on the top
of the foundation. The sill acts as a insulated buffer between the concrete and
the greenhouse frame reducing heat loss. Recommended materials for sills include
naturally resistant woods, such as cedar, redwood, or cypress and plastic composite
lumber. The greenhouse base can be attached using concrete anchor bolts which
are available at most home centers and hardware stores. Set bolts within
1 ft. of each corner, then space additional anchor bolts about 4 ft. apart.
- Concrete Wall Foundation -
With this foundation, the concrete wall is set on a footing below
the frost line. This type of foundation gives good support for heavier structures
like greenhouses glazed with glass. To build the wall, first dig a trench in the
soil to below the frost line and place forms for the footing. Check with the local
building inspector to determine what this depth is and to see if an inspection
is required before the footing is poured. The footing is usually twice as wide
as the wall and equally as thick.
After the footing hardens, place the wall forms on top to pour the walls. The
wall height should be a minimum of 6 inches above grade. At this point, you should
install drains around the perimeter to drain water away from the site. You can
finish the outside wall several ways. You can leave it plain, paint it, or face
it with brick or stone. To reduce heat loss, attach an inch or two of insulation
board to the inside or outside surface. Now you are ready to backfill soil against
the foundation and grade. One recommended option whether you use a slab or wall
is to fasten a 2" x 4" sill on the top of the foundation. The sill acts
as a insulated buffer between the concrete and the greenhouse frame reducing heat
loss. Recommended materials for sills include naturally resistant woods, such
as cedar, redwood, or cypress and plastic composite lumber. The greenhouse base
can be attached using concrete anchor bolts which are available at most home centers
and hardware stores. Set bolts within 1 ft. of each corner, then space
additional anchor bolts about 4 ft. apart.
Grow More Greenhouses
| Solar Harvest Greenhouses | Cross
Country Greenhouses
Copyright Aarons Creek Farms, Inc. All Rights Reserved.
|